
Public & Private Nodes on Docker

If you are running more than a few nodes, it’s a good idea to set up public and private nodes. I’m running a docker host with 15 nodes, and I want to use 2 as public nodes and 13 as private nodes. In this way, the 13 private nodes will directly connect to only the 2 public nodes. It’s a good idea to have at least 2 public nodes, that way if one needs to be stopped the other can still provide a connection for your nodes.
This guide should work for other setups as well, not just Docker, but you may need to adapt some things.
The first step is to grab your network IDs for all of your nodes. You can do this with gprcurl. If you don’t have it installed check out this article. With gprcurl installed run this command:
grpcurl -plaintext <IP of NODE>:9092 spacemesh.v1.DebugService.NetworkInfoMake sure to replace <IP of NODE> with the IP address of your node. You can grab this from portainer if you have it installed, or docker through the command line. For each node copy the network ID and save it.
Public Node
With public nodes, we are just going to add the network IDs of our private nodes to the config. This is what you will be adding:
"direct": [
        "/ip4/<PRIVATE NODE IP>/tcp/7513/p2p/<PRIVATE NODE NETWORK ID>",
],
You need to add that to your "p2p” section. You can reference an example I have on my github here: Hake Hardware
Just remember there are three things you need to change:
Update your IP Address for each of your private nodes
Update your Port (default is 7513)
Update your Network ID
In the end it should look something like this:
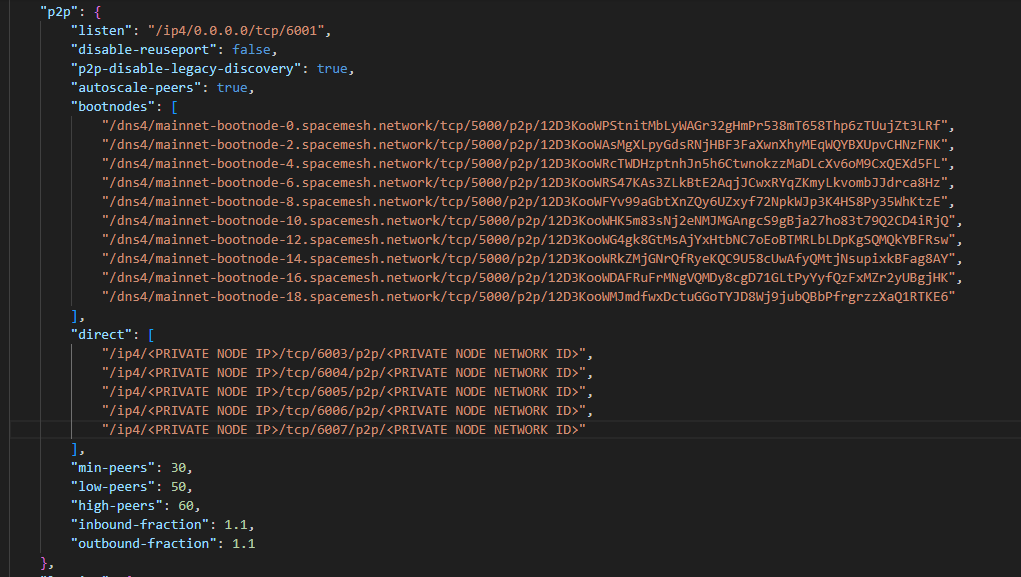
Also, you may want to increase the number of peers your public nodes connect to as I have done. 30, 50, 60 seems like a decent option.
Now at this point if your node is running you should stop it. Next we are going to delete out some files. Go to the folder where your state is and there should be a folder called ‘p2p’. You should delete out all of the files except ‘p2p.key’. You could possibly skip this step, but I notice that sometimes the node would only connect to the previous nodes it connected to last time. This seems to force the node to refresh it’s list of nodes, and include the direct peers as well.
You can start your public node now. Repeat this for each public node you want.
Private Node
The private node is similar, we will start with the config file. Go back to the ‘p2p’ section and delete out the following sections:
autoscale-peers
bootnodes
min-peers
low-peers
high-peers
inbound-fraction
outbound-fraction
Next add in a section for disabling dht
"disable-dht": true,Then add in your direct section, but this time only add your public nodes
        "direct": [
            "/ip4/<PUBLIC NODE IP>/tcp/6001/p2p/<PUBLIC NODE NETWORK ID>",
            "/ip4/<PUBLIC NODE IP>/tcp/6002/p2p/<PUBLIC NODE NETWORK ID"
        ]
Like before remember there are three things you need to change:
Update your IP Address for each of your public nodes
Update your Port (default is 7513)
Update your Network ID
Then below that add back the ‘bootnodes’ but leave it empty. Like this:
"bootnodes": [],Your ‘p2p’ section should look something like this:
    "p2p": {
        "listen": "/ip4/0.0.0.0/tcp/6001",
        "disable-reuseport": false,
        "p2p-disable-legacy-discovery": true,
        "disable-dht": true,
        "bootnodes": [],
        "direct": [
            "/ip4/<PUBLIC NODE IP>/tcp/6001/p2p/<PUBLIC NODE NETWORK ID>",
            "/ip4/<PUBLIC NODE IP>/tcp/6002/p2p/<PUBLIC NODE NETWORK ID"
        ]
    },
Stop your node and follow the same steps as before to delete everything but the p2p.key in the ‘p2p’ folder. Once that is complete restart your node. If for some reason it still connects to more than just your specified public nodes, ensure your private config looks good and restart your node again.
And that’s it! Keep in mind if you take your public nodes offline then your private nodes will fail to sync. You could configure the private node to also connect to a few external public nodes by removing the bootnodes but keeping everything else in the private node config. But as long as you have 2 public nodes you should be fine.
That’s it for this article, thanks for reading!